한국 아이폰
홈페이지
제주 카톡 복구 아이폰 카카오톡 파일 복원
부여 아이폰14pro 침수 사진 문자메시지 내용 데이터복원
도봉아이폰수리 (아이폰충전단자수리)
아이폰12미니 iPhone12mini 64GB 128GB 256GB 자급제, 화이트 찐 리뷰 후기 추천
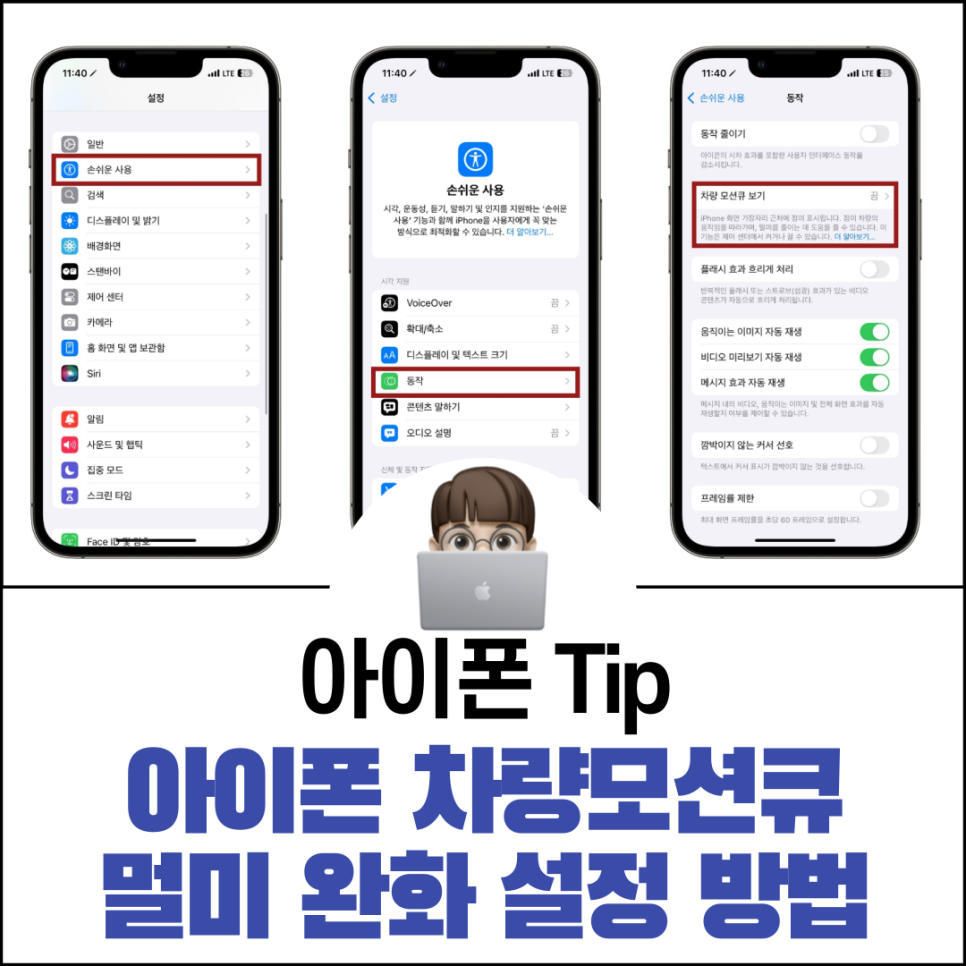
아이폰 차량모션큐 멀미 완화를 위한 설정 방법
Apple 2022 아이폰 SE 3세대 자급제, 스타라이트, 256GB 가볍고 산뜻한 일상
2년 실사용 후 재구매한 슈피겐 아이폰 투명 맥세이프 케이스
원주 아이폰11pro 침수 사진 문자메시지 연락처 데이터복구 센터 비용
29000원 6액정 정품 교체 장한평 서울 아이폰수리점
Apple 아이폰 13 Pro 자급제, 실버, 128GB 자연을 담은 선물
아이폰 SE1 1세대 풀박스 공기계 언락폰 세컨폰 16GB 32GB, 로즈 골드 S급 매일 상쾌한 기분
Apple 아이폰 13 mini 자급제, 128GB, 그린 건강한 일상을 위한
아이폰12미니 iPhone12mini 64GB 128GB 256GB 자급제, 퍼플 행복을 담은 제품
Apple 아이폰 12 Pro Max 자급제, 퍼시픽 블루, 128GB 자연이 주는 깨끗함
Apple 정품 아이폰 14 자급제, 퍼플, 128GB 편안함의 완성
Apple 아이폰 12 Pro 자급제, 128GB, 그래파이트 소중한 날을 위해
아이폰 5S 공기계 16기가 세컨폰 학생폰 패키지, 64GB, 64GB, 스페이스 그레이 64GB 언제나 상쾌한
오퀴즈 6시 정답 KT닷컴 아이폰16 7시 매일매일 쿠팡 혜택 8시 경동 나비엔 숙면매트 정답 11월 19일
아이폰13미니 iPhone13Mini 128GB 256GB 자급제, 화이트 피부에 선물 같은
Apple 2022 아이폰 SE 3세대 자급제, 스타라이트, 128GB 실사 사용 후기
연인모바일 아이폰5s 16GB 당일발송 국내배송 정식수입신고필증 KC인증 공기계 자급제 인스타사진용, 03. 골드(중급) 지친 일상에 활력을
Apple 아이폰 12 Pro 자급제, 256GB, 그래파이트 기분 좋은 하루의 시작
아이폰 11 Pro 자급제, 256GB, 실버 하루의 활력을 담다
아이폰 16 Pro 자급제: 새로운 혁신이 가득한 손안의 작은 우주!
Apple 2022 아이폰 SE 3세대 자급제, 미드나이트, 64GB 언제 어디서나 간편하게
아이폰13미니 iPhone13Mini 128GB 256GB 자급제, 화이트 언제나 신선하게
아이폰12미니 iPhone12mini 64GB 128GB 256GB 자급제, 그린 가볍고 산뜻한 일상
아이폰 11 Pro 자급제, 256GB, 미드나잇 그린 하루의 작은 기쁨
아이폰 SE1 5S 1세대 공기계 언락폰 16GB 스페이스그레이 세컨폰, 스페이스 그레이, 16 기가 바이트, 모바일 유니콤 듀얼 4G 새롭게 시작하는 기분
아이폰SE 중고 1세대 학생 스마트폰 키즈폰 SE1 4G, 지문인식O+A급, 16GB, 스페이스 그레이 건강한 생활의 동반자